Converting a Microsoft Word document to a PDF is often the final step in sharing or archiving important information. However, the transition isn't always smooth. Have you ever experienced frustration when your accurately formatted Word document turns into a jumbled mess after saving it as a PDF? Fonts change unexpectedly, images shift, and page numbers go haywire. You're not alone.
These inconsistencies can make your documents look unprofessional and difficult to read. The good news is that with a little foresight and attention to detail during the formatting stage in Word, you can ensure a flawless conversion to PDF every time. This comprehensive guide will walk you through the best practices for preparing your Word documents, addressing common pitfalls, and providing you with the knowledge to create pixel-perfect PDFs. Let's dive in and master the art of document formatting before conversion.
Why does my Word document look different as a PDF?
The core reason for formatting discrepancies lies in how Word and PDF handle document elements.
-
Font Handling: Word relies on locally installed fonts. If a recipient or the PDF converter doesn't have the exact same fonts, substitutions occur, leading to visual changes.
-
Layout Engines: Word and PDF viewers use different engines to interpret layout instructions (margins, spacing, etc.). Minor variations in these engines can cause subtle shifts.
-
Object Embedding: Images, tables, and other objects are embedded differently. Without proper anchoring, these elements can float or resize unpredictably during conversion.
-
Printer Drivers (for "Print to PDF"): Using the "Print to PDF" option relies on virtual printer drivers, which can sometimes interpret formatting slightly differently than the direct "Save as PDF" function.
Understanding these fundamental differences is the first step towards preventing conversion issues.
What's the best way to prepare a Word document for PDF conversion? (Quick checklist)
Before you even think about hitting that "Save as PDF" button, run through this quick checklist:
-
Use Styles: Apply Word's built-in heading, paragraph, and list styles consistently.
-
Embed Fonts: Ensure all necessary fonts are embedded within the Word document.
-
Anchor Objects: Properly anchor images and tables to specific paragraphs.
-
Check Page Layout: Verify margins, page size, and orientation.
-
Review Hyperlinks: Test all hyperlinks to ensure they are correct.
-
Final Review: Zoom out to get an overview and carefully proofread.
Taking a few extra moments for these steps can save you significant headaches later.
How to embed fonts in Word for seamless PDF conversion?
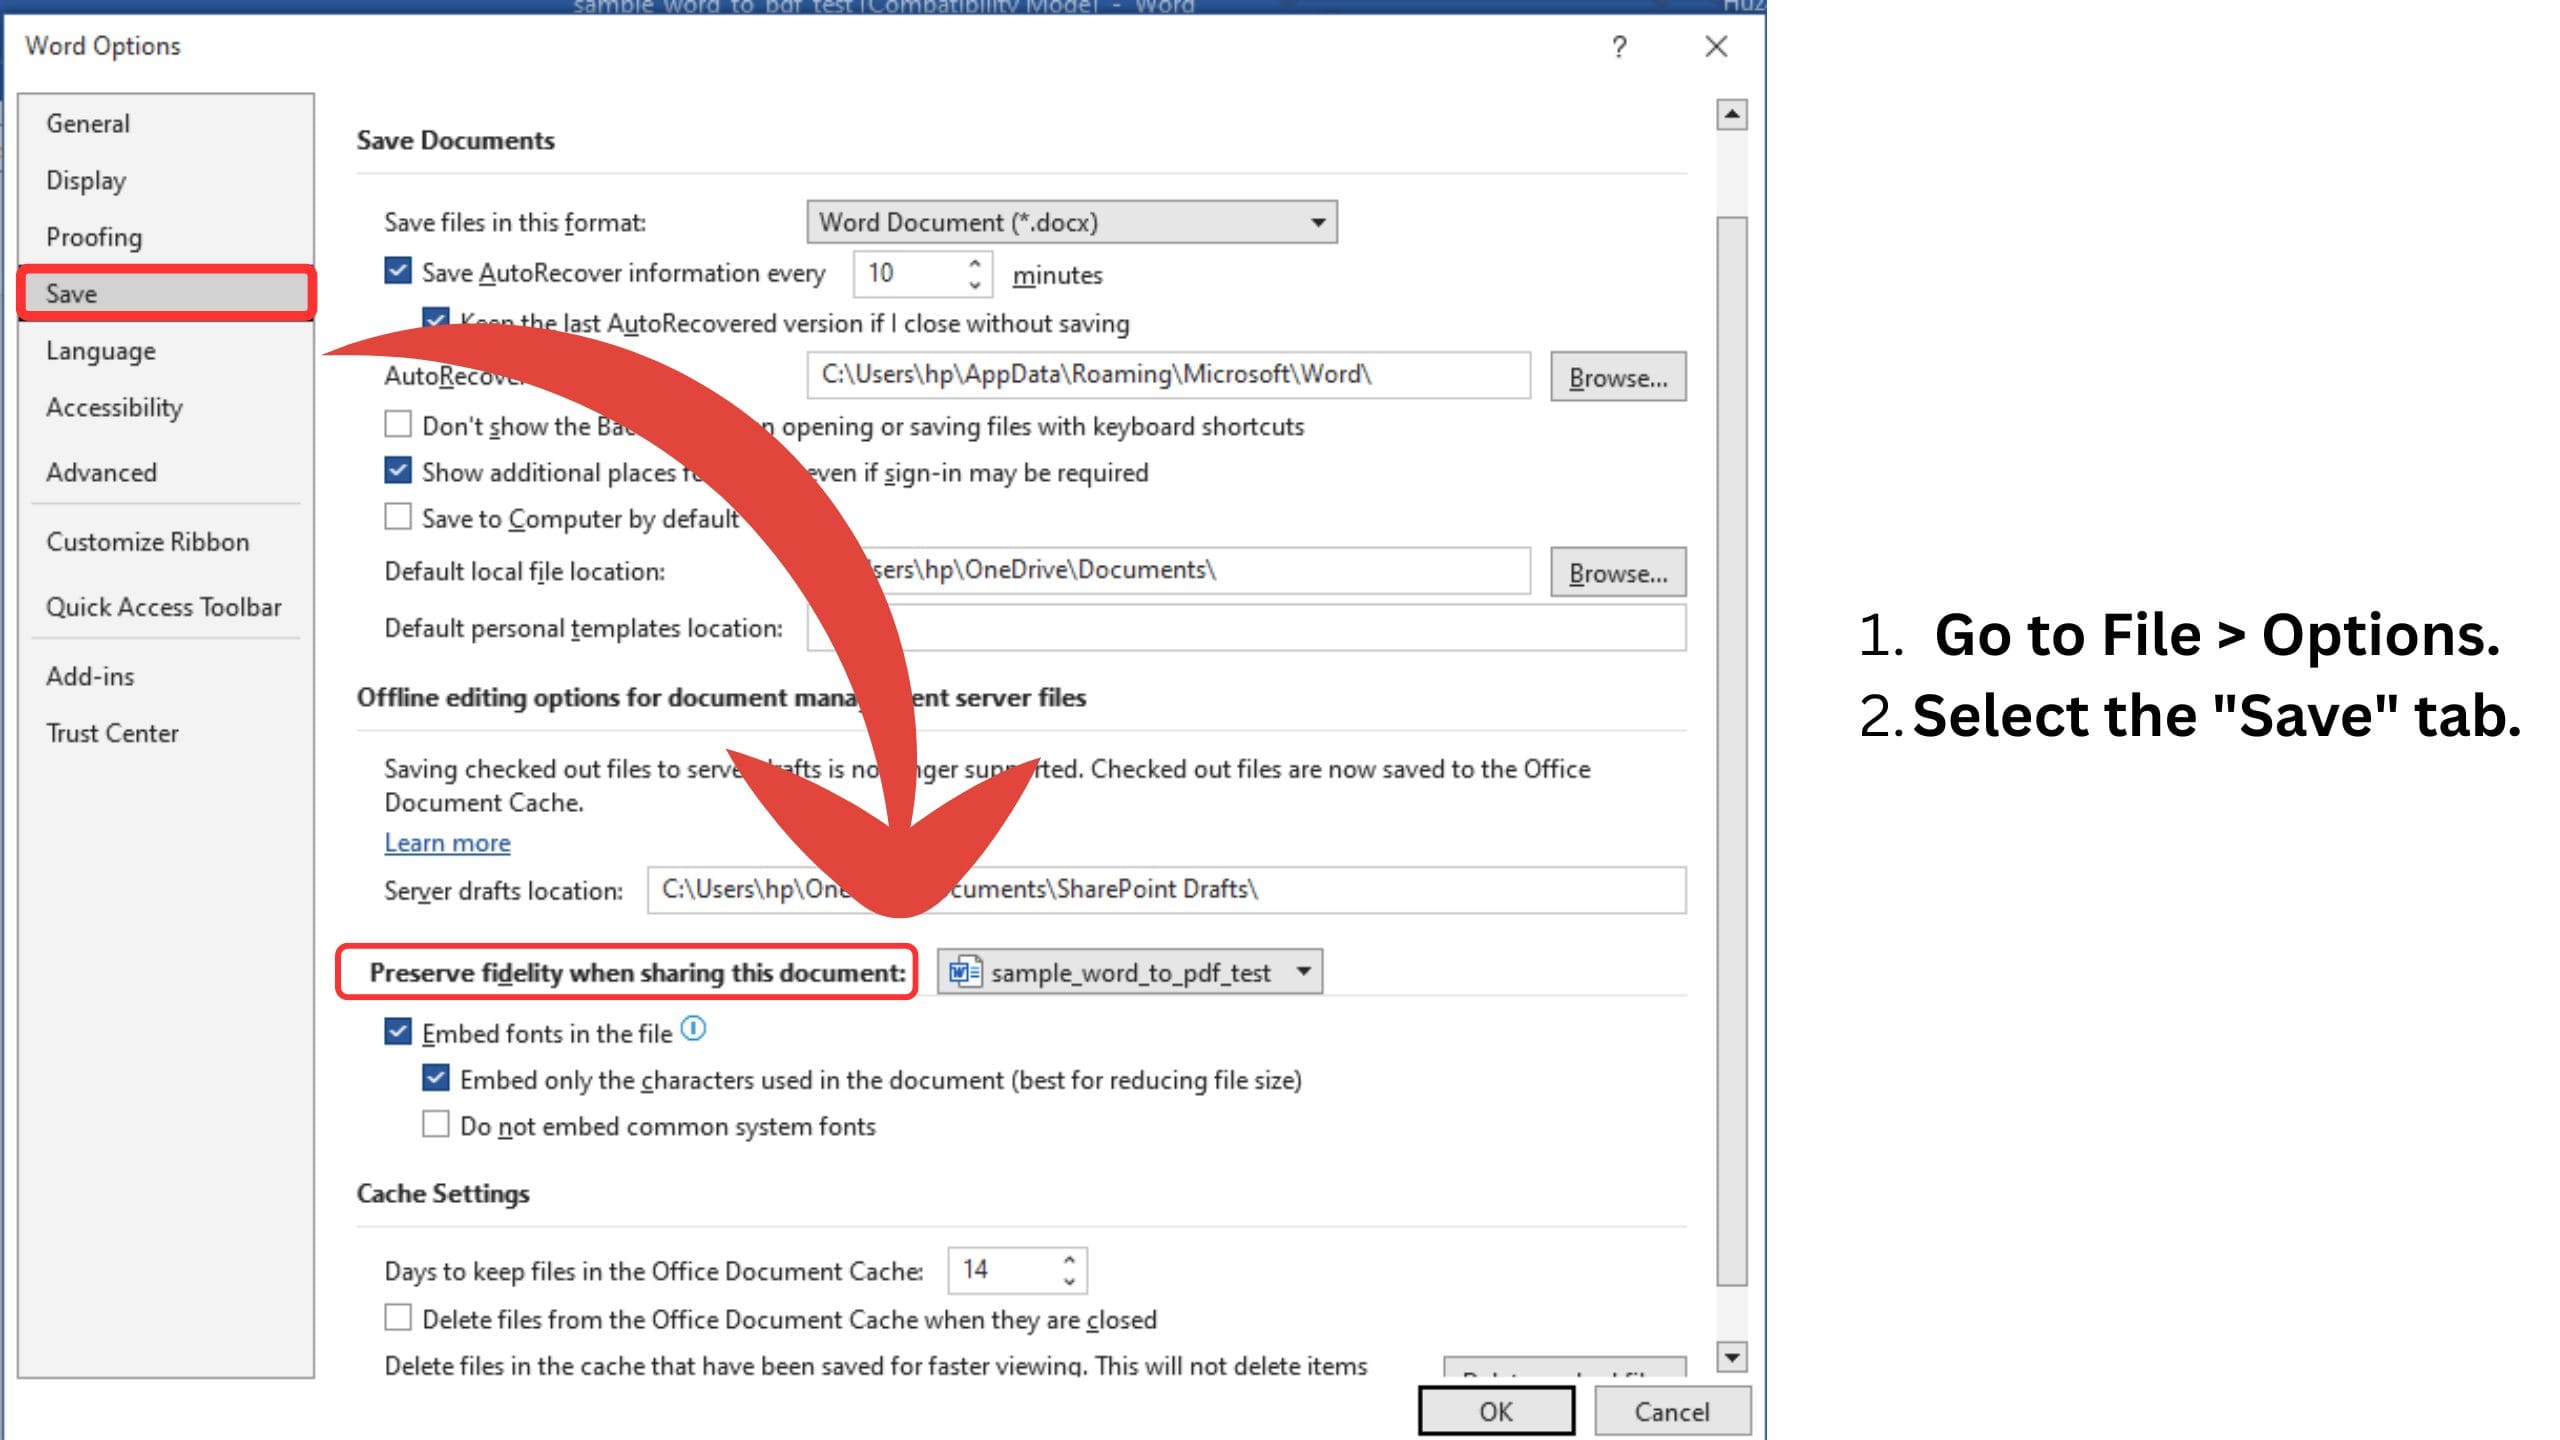
Embedding fonts ensures that the PDF will display your chosen typography correctly, even if the viewer doesn't have those fonts installed. Here’s how:
-
Go to File > Options.
-
Select the "Save" tab.
-
Under "Preserve fidelity when sharing this document," check the box next to "Embed fonts in the file."
-
You have two options:
-
Embed only the characters used in the document (best for reducing file size): This is usually sufficient.
-
Embed all characters (best for editing the PDF later): This will increase the file size.
-
-
Click "OK."
By embedding fonts, you significantly reduce the risk of font substitution and ensure your document's visual integrity.
Why are my fonts changing in PDF? (And how to fix it)
If you didn't embed fonts, or if you used obscure or unsupported fonts, the PDF reader will substitute them with default fonts. This can drastically alter the look and feel of your document.
How to fix it:
-
Embed Fonts (as described above) in the original Word document and re-convert.
-
Use Standard Fonts: Opt for widely available fonts like Arial, Times New Roman, Calibri, or Cambria, which are likely to be present on most systems.
-
Check the PDF: After conversion, always open the PDF and carefully review the fonts used. If you see unexpected changes, go back to your Word document and embed the correct fonts.
How to set page margins and layout for consistent PDFs?
Inconsistent page margins and layout in the original Word document will translate directly (and often amplified) into the PDF.
-
Define Margins Clearly: Go to the "Layout" tab in Word and set your desired margins (Top, Bottom, Left, Right). Use specific measurements (e.g., 1 inch) rather than relying on default settings.
-
Check Page Size and Orientation: Ensure the page size (e.g., Letter, A4) and orientation (Portrait, Landscape) are correctly set under the "Layout" > "Size" and "Orientation" options.
-
Be Mindful of Section Breaks: If your document uses section breaks with different layout settings, double-check that these are intentional and correctly formatted before converting. Incorrect section break settings are a common cause of layout issues.
Why are my images and tables moving around in the PDF? (Tips for anchoring and stability)
The way Word handles the positioning of images and tables can lead to unexpected movement in the PDF if not managed correctly.
-
Anchor Images: Right-click on an image, select "Size and Position," and go to the "Text Wrapping" tab. Choose a wrapping style other than "In line with text" (e.g., "Square," "Tight"). Then, on the "Position" tab, ensure the "Object Anchors" box is checked. Drag the anchor symbol to the paragraph you want the image associated with. This helps the image stay relative to that text.
-
Table Positioning: For tables, avoid simply inserting them into a paragraph. You can adjust their position by right-clicking on the table, selecting "Table Properties," and going to the "Table" tab. Under "Text wrapping," choose "Around." Then, similar to images, you can often drag the table to a desired location, though explicit anchoring is less common for tables. Using clear breaks before and after tables can also improve stability.
-
Avoid Floating Objects: Minimize the use of floating text boxes or graphics unless absolutely necessary, as their positioning can be particularly unpredictable during conversion.
How to use heading styles in Word for better PDF navigation?
Using Word's built-in heading styles (Heading 1, Heading 2, etc.) is crucial for creating a navigable PDF with bookmarks.
-
Apply Styles Consistently: Instead of manually formatting headings with bold text and a larger font size, use the appropriate heading styles from the "Home" tab. This creates a semantic structure in your document.
-
Generate a Table of Contents (Optional but Recommended): If you've used heading styles correctly, Word can automatically generate a Table of Contents. This TOC will often translate into clickable bookmarks in the PDF.
-
Check PDF Bookmarks: After converting to PDF, most viewers will display a bookmarks panel (usually on the left). Verify that your headings have been correctly recognized as bookmarks, allowing for easy navigation through the document.
What are the best practices for handling hyperlinks and clickable text in Word to PDF?
Maintaining active hyperlinks in your PDF is essential for usability.
-
Insert Hyperlinks Correctly: Use Word's "Insert" > "Link" (or "Hyperlink") feature to add web addresses, email addresses, or links to other parts of the document.
-
Test Hyperlinks in Word: Before converting, click on all your hyperlinks in Word to ensure they are working correctly.
-
Verify Hyperlinks in PDF: After conversion, double-check that the hyperlinks are still active and point to the correct destinations in the PDF. Sometimes, complex formatting around hyperlinks can cause issues.
Why is my Table of Contents (TOC) not working in the PDF? (Ensuring clickable links)
If your TOC isn't creating clickable links in the PDF, it usually means that Word's heading styles weren't used correctly when creating the TOC.
-
Re-apply Heading Styles: Ensure that all the entries you want in your TOC are formatted with Word's built-in heading styles (H1, H2, etc.).
-
Update the Table of Contents: After making any changes to heading styles, right-click on your TOC in Word and select "Update Field" > "Update entire table."
-
Save as PDF Properly: Use the "Save as PDF" option. The conversion process should recognize the linked structure created by Word's TOC feature. Avoid "printing" to PDF if this is the issue.
How to properly insert and format headers and footers for PDF consistency?
Headers and footers often contain important information like page numbers, document titles, or dates. Consistent formatting in Word is key to a clean PDF.
-
Use Word's Header & Footer Feature: Go to "Insert" > "Header" or "Footer" to add and format these elements.
-
Ensure Consistency Across Sections: If your document has sections with different headers or footers, double-check that these are set up correctly using section breaks and the "Link to Previous" option as needed.
-
Check Page Numbering: Verify that page numbering starts correctly and follows the intended sequence throughout the document. Pay attention to different numbering formats in different sections.
Why are my page breaks and numbering messed up after converting to PDF?
Incorrectly inserted or managed page breaks and numbering are common culprits for PDF inconsistencies.
-
Use "Insert" > "Page Break": To force a new page, use the dedicated "Page Break" command rather than hitting "Enter" repeatedly.
-
Manage Section Breaks: Understand the different types of section breaks (Next Page, Continuous, Even Page, Odd Page) and use them appropriately to control page numbering and layout within different parts of your document.
-
Customize Page Numbering: Go to "Insert" > "Page Number" > "Format Page Numbers" to set the starting number and numbering style for different sections. Ensure that "Continue from previous section" or "Start at" is selected as needed.
How to handle complex layouts like columns and text boxes for a clean PDF?
Complex layouts can sometimes present challenges during PDF conversion.
-
Columns: If using columns, ensure the text flows correctly within each section and that column breaks are appropriately placed. Sometimes, simplifying complex multi-column layouts can improve conversion reliability.
-
Text Boxes: While text boxes can be useful, they can also be prone to shifting. Anchor them firmly to a specific part of the main text flow. Consider if the content within a text box could be integrated directly into the main document for better stability.
-
Test Thoroughly: For documents with complex layouts, always review the generated PDF very carefully on different devices and PDF viewers to identify any unexpected shifts or overlaps.
What is the difference between "Save As PDF" and "Print to PDF"? (When to use each)
Both options convert your Word document to a PDF, but they work differently:
-
Save As PDF: This is generally the preferred and more reliable method. Word directly converts the document to PDF format, preserving most of the document structure, metadata, and interactive elements (like hyperlinks and bookmarks) more effectively.
-
Print to PDF: This option uses a virtual printer driver to "print" your document to a PDF file. It essentially takes a snapshot of how the document would look if printed. This method can sometimes be useful for flattening complex documents or resolving minor conversion issues, but it might also lead to a loss of interactive elements or slight formatting variations depending on the printer driver.
Best Practice:
Unless you have a specific reason to "print" to PDF (e.g., troubleshooting a specific issue), always use the "Save As PDF" option for the most accurate and feature-rich conversion.
Why is my PDF file size so large? (Best image compression practices)
Large PDF file sizes can be inconvenient for sharing and storage. Images are often the primary contributors to this issue.
-
Compress Images in Word: Before converting, you can compress images directly within Word. Select an image, go to the "Picture Format" tab, and click "Compress Pictures." You can choose to apply the compression to all images in the document and select a target output (e.g., "Email (96 ppi)" for screen viewing).
-
Insert Optimized Images: When inserting images, try to use images that are already appropriately sized and have a suitable resolution for their intended use in the PDF. Avoid inserting very high-resolution images if they will only be viewed on screen.
-
Consider PDF Optimization Tools: After creating the PDF, you can use separate PDF optimization software to further reduce the file size without significantly compromising quality.
How to fix blurry or low-quality images after PDF conversion?
Blurry images in a PDF can look unprofessional. This often happens due to insufficient image resolution in the original Word document or aggressive compression during conversion.
-
Use High-Resolution Images in Word: Ensure the images you insert into your Word document have a sufficiently high resolution for their intended size in the PDF. Avoid stretching small, low-resolution images, as this will lead to pixelation.
-
Adjust PDF Conversion Settings: When using "Save As PDF," click on "Options." Look for settings related to image compression or quality. Sometimes, adjusting these settings to a higher quality or reducing compression can help.
-
Re-insert Images: If the images are consistently blurry after trying different settings, consider re-inserting the original image files into Word to ensure they haven't been downsampled inadvertently.
How to maintain document security and password protection in the PDF?
If your PDF contains sensitive information, you might want to add security features.
-
Use Word's Built-in Security Options: When using "Save As PDF," click on "Options." Under "Encrypt the document with a password," you can set a password to restrict who can open or edit the PDF.
-
Explore Advanced PDF Security Features: More advanced PDF editing software offers a wider range of security options, such as restricting printing, copying, or modifying the content.
What are the best settings in Microsoft Word's "Save as PDF" dialog box?
The "Save as PDF" dialog box offers several options that can impact the final PDF output. Here are some key settings to consider (accessed by going to File > Save As > PDF > Options):
-
Optimize for:
-
Standard (publishing online and printing): This is generally the best option for most users, balancing file size and quality.
-
Minimum size (publishing online): Choose this if file size is a primary concern and high print quality is not required.
-
-
Include non-printing information:
-
Bookmarks: Ensure this is checked if you want your Word headings to become navigable bookmarks in the PDF.
-
Document properties: You can choose whether or not to include metadata like author, title, etc.
-
-
PDF/A compliant: Choose this if you need to create a PDF for long-term archiving. (More on this below).
-
Bitmap missing fonts: Leave this checked to prevent issues if a font cannot be embedded.
-
Encrypt the document with a password: As discussed earlier, use this to add security.
Experiment with these settings based on your specific needs and the intended use of your PDF. I personally use these settings and it work well for me.
What's the difference between PDF/A vs. standard PDF?
-
Standard PDF: The most common type of PDF, suitable for general use, printing, and online sharing. It can contain various interactive elements, multimedia, and dynamic content.
-
PDF/A: An ISO-standardized version of PDF designed for long-term archiving and preservation of electronic documents. It restricts certain features (like JavaScript, embedded non-standard fonts without embedding information, and external links) to ensure the document can be reliably viewed and reproduced in the future, regardless of the software used.
If you need to archive a document for many years and ensure its long-term accessibility, choose the PDF/A option during the "Save As PDF" process (under "Options").
A final checklist before converting Word to PDF
Before you finalize the conversion, take one last look at your Word document:
-
Have I used heading styles consistently?
-
Are all necessary fonts embedded?
-
Are images and tables anchored correctly?
-
Are page margins and layout as intended?
-
Are all hyperlinks working?
-
Is the Table of Contents updated?
-
Are headers and footers consistent?
-
Is page numbering correct?
-
Have I compressed large images?
-
Have I proofread for any errors?
By diligently following these best practices, you can significantly reduce the chances of formatting surprises and create professional, polished PDF documents every time.
Mastering document formatting in Word before converting to PDF is an investment in professionalism and clarity. By understanding the nuances of font handling, layout, object anchoring, and the various PDF conversion options, you can take control of the final output and ensure your documents look exactly as intended. Don't let formatting errors undermine your hard work. Take the time to format your Word documents meticulously, and you'll enjoy seamless and stress-free PDF conversions. So, before you hit that "Save as PDF" button, remember the best practices outlined in this guide and take a moment for a final check – your readers will thank you!